 Italiano
Back to: CG4100
AZ409 Dresser
{tab=FACE}
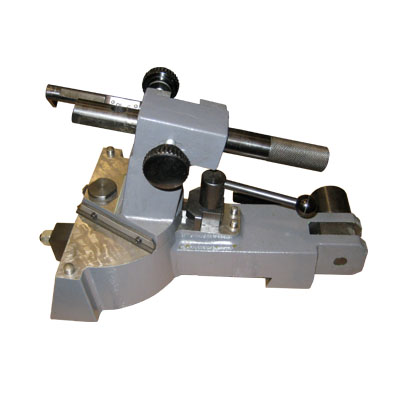
1. Dressing of the grinding wheel is probably the single most important factor in producing satisfactory work on your crankshaft grinder. The grinding wheel must be dressed each time it is placed on the machine even though it may not have been removed from the wheel center. 2. Mount the wheel dresser on the grinder table (1). Bring the rotating grinding wheel up close to the diamond and start the coolant flow. Never dress without coolant as frictional heat buildup can cause the diamond to separate from its mount and also affects the flatness of the dress. 3. Best results will be obtained if the diamond is brought into contact with the center portion of the wheel, fed in a maximum of .002” then traversed each direction (left and right) off the edge of the wheel. 4. Learning the best traverse rate for dressing of the wheel is a matter of trial and experience for each operator. The rate must be fast enough to prevent glazing of the wheel and slow enough to minimize spiral lead marks. Dressing from the center of the wheel outward to each edge will also help minimize the effect of the spiral lead marks on the finish of the workpiece. 5. The type of dress applied to the grinding wheel may be changed to suit different grinding needs. A rapid, coarse dress will result in a wheel surface which will remove large amounts of material quickly but will not provide a smooth finish. A smoother dress on the wheel will produce smoother finishes but will not remove material as fast. 6. To keep the diamond sharp, rotate it in the dresser shank 30°-45° after each dressing operation. 7. Always be sure the hydraulic wheelhead infeed is at its forward most position and the selector switch is left in the forward position while dressing. {tab=SIDE }
Note: the machine is intended to use grinding wheels with tapered sides.
1. Whenever the sides of a grinding wheel are found to run out, they should be dressed.
This can be accomplished using the wheel dresser with the diamond placed in it (2).
2. The diamond should be brought into contact with the grinding wheel near its front corner, fed in a maximum of .002” then the wheel is moved in and out until the necessary amount has been dressed from the wheel.
For other side rotate the dresser to 180°
Dress off enough material to provide a continuous smooth grinding surface on each side of the wheel.
3. To keep the diamond sharp rotate it in the dresser shank 30°-45° after each dressing operation.
{tab=RADIUS}
1. When regrinding a crankshaft, every attempt should be made to duplicate the original corner radii in order that the crankshaft not be weakened.
2. Position the special radius dresser diamond in the diamond holder facing out the front. Slide the holder back.Position and lock the radius
adjuster at the desired dimension then slide the diamond holder forward until the diamond contacts the radius adjustment stop (4).
Tighten the diaInond holder and unlock and retract the adjustment op.
3. With grinding wheel off bring wheel forward and fine feed to within .002 to .003 of the diamond. Use a brass shim stock to gage this distance (3).
NOTICE: The radius dressing diamond should not be used for face or side dressing.
Traverse the table until the diamond is just to the right of the wheel.Unclamp the clamp block and rotate the block as the dresser arm is swung to the right.
Reclamp the clamp block to form a center stop for the dresser arm.
4. While moving the dresser arm back and forth around the pivot point slowly traverse the table to the left.
The wheel radius is dressed when the diamond just makes contact with the side of the wheel.
This will be the last pivot to complete the radius (3).
5. Bring the dresser arm to the center position and lock in place. Traverse the table until the diamond is just to the left edge of the wheel and repeat the above procedure.
{tab=VIDEO}
{youtube}9kaBRFGhK1E{/youtube}